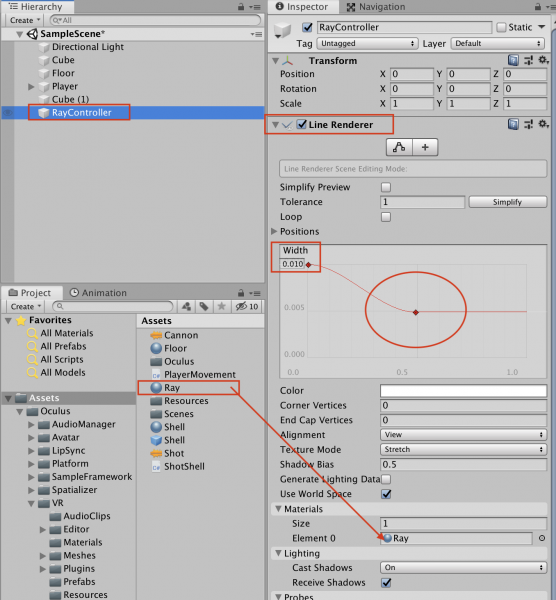
(1)LineRendererの設定
- 新規にCreate Emptyを作成
- 名前を「RayController」に変更
- 「Line Renderer」コンポーネントを追加
- 「Width」を「0.01」に変更
- 減衰曲線は自由に設定
- マテリアルを作成して好きな色を設定
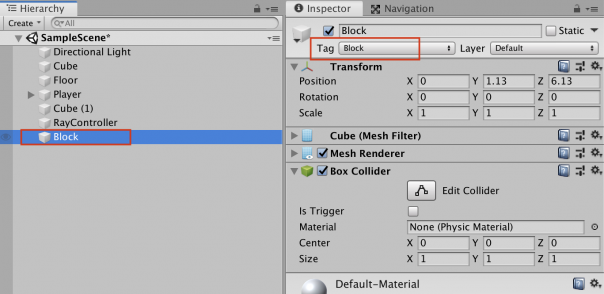
(2)ブロック(対象物)の作成
- 新規にCubeを作成
- 名前を「Block」に変更
- 「Tag」に「Block」を設定(ポイント)
- 今回はVR空間内で、このBlockの色を変化させます。
(3)スクリプトの作成
- 新規にC#スクリプトを作成
- 名前を「RayController」に変更
- 下記のコードを書いてチェック
using System.Collections;
using System.Collections.Generic;
using UnityEngine;

public class RayController : MonoBehaviour
{
    public Transform anchor;
    public AudioClip sound;
    private float maxDistance = 100;
    private LineRenderer lineRenderer;

    void Start()
    {
        lineRenderer = GetComponent<LineRenderer>();
    }

    void Update()
    {
        RaycastHit hit;
        Ray ray = new Ray(anchor.position, anchor.forward);

        lineRenderer.SetPosition(0, ray.origin);

        if(Physics.Raycast(ray, out hit, maxDistance))
        {
            lineRenderer.SetPosition(1, hit.point);

            GameObject target = hit.collider.gameObject;

            // 右コントローラのAボタンを押した場合
            if(OVRInput.GetDown(OVRInput.RawButton.A))
            {
                if(target.CompareTag("Block"))
                {
                    // 効果音を鳴らす。
                    AudioSource.PlayClipAtPoint(sound, transform.position);

                    // ブロックを赤色に変化させる。
                    target.GetComponent<MeshRenderer>().material.color = Color.red;
                }
            }
        }
        else
        {
            lineRenderer.SetPosition(1, ray.origin + (ray.direction * maxDistance));
        }
    }
}
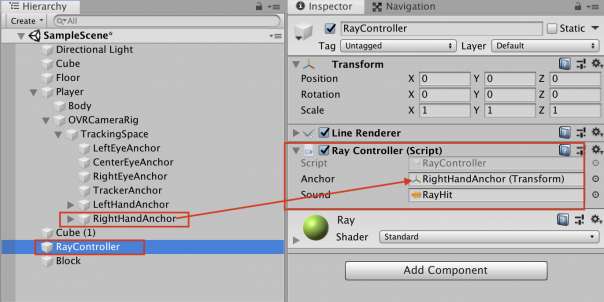
(4)設定
- スクリプトをRayControllerオブジェクトに追加
- Anchor(起点)はRight Hand Anchorを設定
- 効果音は自由
(5)ビルド&ゲーム再生
- 設定が完了したらOculus Quest2にビルドして再生
- 右手からレーザー光線が出ているのを確認。
- ブロックにレーザー光線を当ててAボタンを押すと、ブロックが赤色に変化すれば成功です。